
The following is a small exert from my upcoming first book on powerlifting.
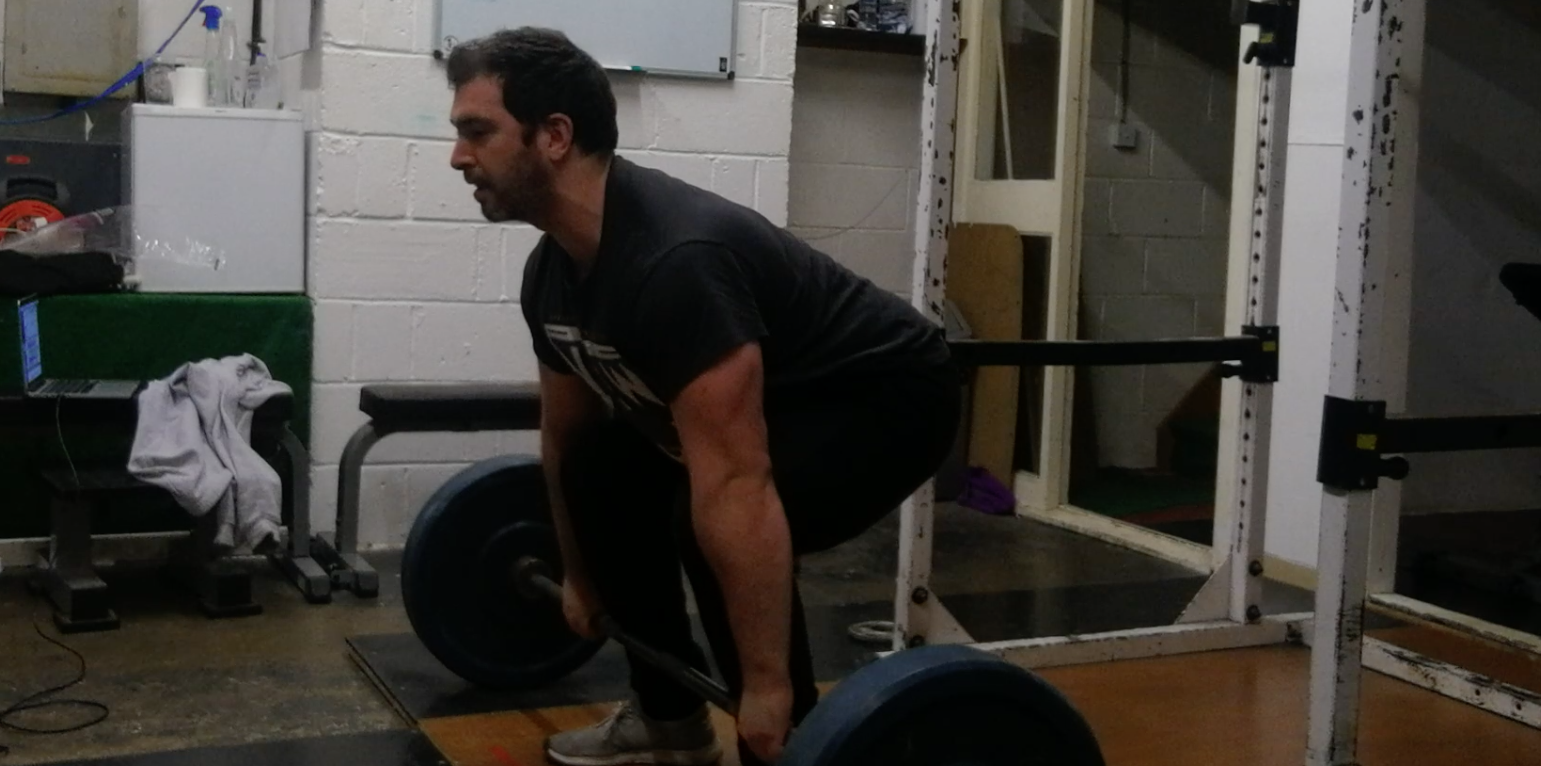
The conventional deadlift puts your hips further away from your centre of mass than any of the other powerlifts this can be overcome slightly by adopting the sumo deadlift if you have the leverages for it. However, both of these lifts especially the conventional deadlift are going to separate your hips and the barbell by the largest distance which is going to create the largest lever arm on the spine. This means that deadlift is going to put the greatest amount of force through your spine than any of the other powerlifts. Now add in the fact that the load is put into your hands and not actually placed directly on the column of the spine which means the shearing forces being placed on your back are much greater than that in the squat (assuming you can squat with approaching good technique).
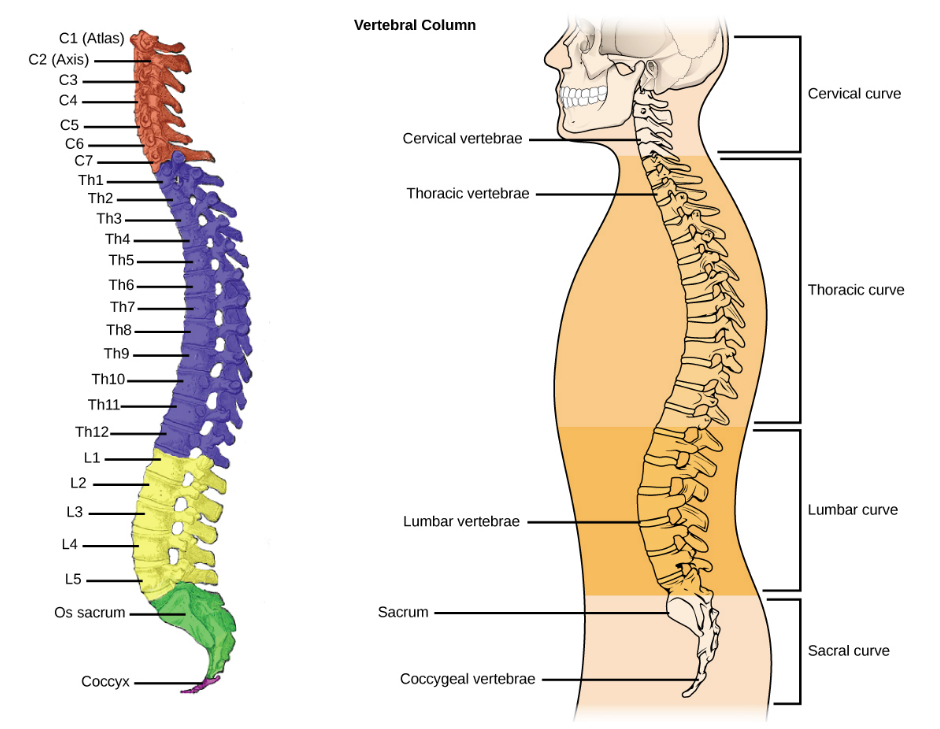
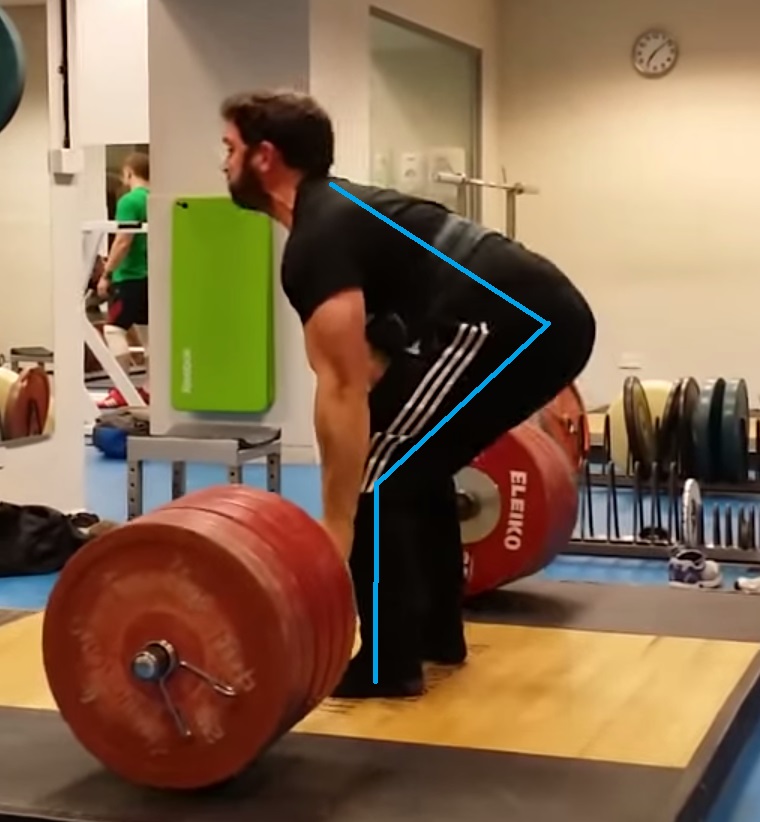
To keep your spine as protected as possible it is important to keep it in the position that gives it the greatest strength for this we are looking to hold the natural “S” curve of the spine. When a normal healthy person stands upright in a good posture their spine contours to a natural S shape. The lumbar spine (lower portion of the spine) creates an inward curvature. The thoracic spine creates an outward curve (the upper portion of the spine). With finally the cervical spine (the neck) creating the final inward curvature of the spine. This natural curvature is shown in the figure below.

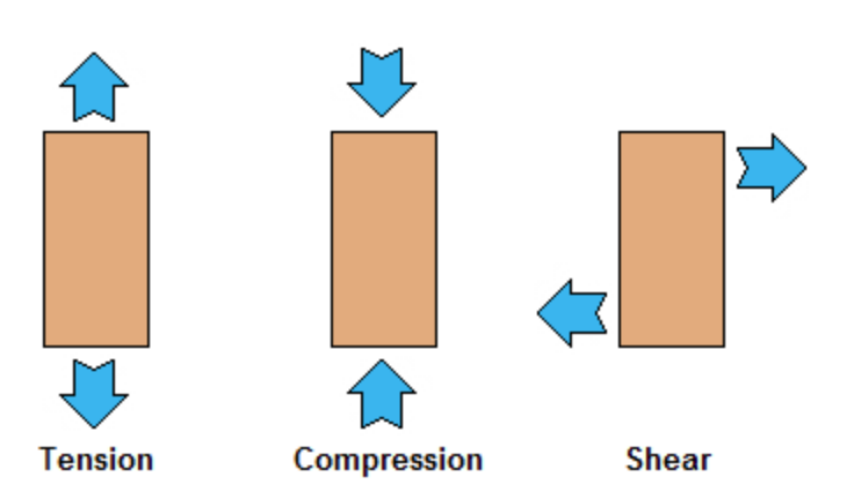
Both the squat and the deadlift will apply a combination of shear and compressive forces on the spine. A healthy spine will be able to take both compression and shearing forces without much if any complaint, however, the spine is essentially a column and just like a column used to hold up a ceiling in a building it is much better at taking compressive loads than it is at taking shear or lateral forces. For the deadlift, your spine will be orientated more horizontal to the floor than in the squat with maybe the exception of sumo deadlifters who are built and able to leverage the bar free from the floor while keeping their hips very close to the bar and their spine stacked vertically.
Authors note – this is assuming you have an average of “healthy” spine there are a number of athletes or individuals with curvatures of the spine that don’t conform to the average shape. There are also plenty of gym goers and athletes with disabilities and neurological disorders. Don’t let this put you off lifting weights if you are willing to find a compromise/technique and training structure that works for you as an individual you should be able to engage in resistance training safety.
For spinal health maintaining this posture under load is of the utmost importance for any lifter or athlete who is looking to introduce heavy lifting into their routine. Under no circumstance should a novice, intermediate or even advanced lifter be allowed to move out of a safe range through the back in training, this is without question the number one training sin I see on a regular basis with trainers, people who train themselves or with lifters in the warm-up room of a competition. There may be an argument when a lifter is pushing the boundaries of what they are physically capable of that they will lose technique or position if it means squeezing out a bit more performance. If this is something that happens very infrequently and in order to push for an outcome than it is definitely a strategy you or your lifters can use but it needs to be an informed decision weighed against the rest of your training practices. Allowing your lifters or yourself to round under submaximal loads is not something you should be standing for either from yourself or from those you train. You need to understand the risk and reward of rounding or overextending any portion of your back under load.
There are a number of tools you can use to ensure that your torso is as stiff as possible during the deadlift or during any lift for that matter. These techniques and tips will work equally well for the squat but some will require a bit more context for them to work well for the squat or other lifts for that matter. We will now go through the most important strategies for keeping your trunk stiff and in a uniform shape for the deadlift.
1 – Intra Abdominal pressure and Bracing.
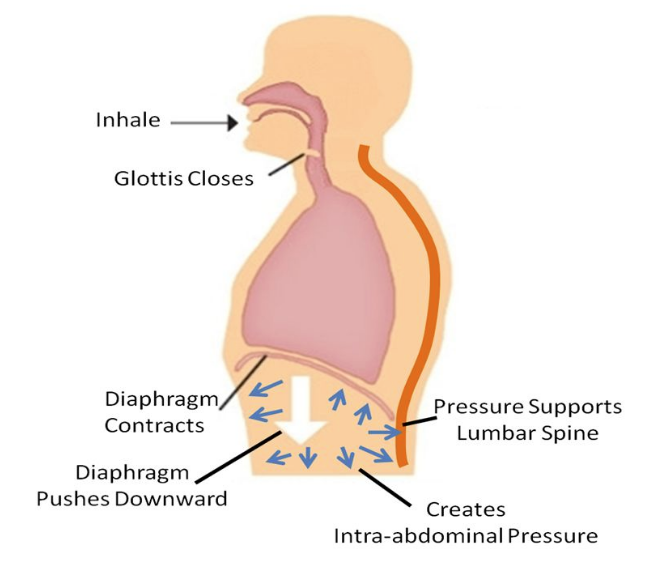
The most important tool you have to help support your spine is intra abdominal pressure. This basically refers to the amount of pressure that is held in your trunk this can be increased by increasing the volume inside of your torso (by increasing the amount of air in your lungs). Or by reducing the space available for the volume within your torso this is done by compacting the area available within your torso the main tool available for which is a lifting belt.
Before you start to include a lifting belt you need to understand how to create as much pressure and stiffness in your abdomen without the aid of a belt or other extrinsic aid. The first step is to learn how to create as much pressure through breathing as possible.
The first thing you should start with is this breathing drill. Standing upright place your fingertips or hands on the side of your trunk from there you should think about drawing breath into the very bottom of your diaphragm. Typically when people think about taking a big breath they think of lifting their rib cage up or filling their “lungs” with air. Now this might sound stupid that you would breathe into anything else other than your lungs but what we are trying to achieve with this drill is to activate more of the trunk, to utilise the diaphragm as much as possible and to try and activate as much of your deeper core muscles (transverse abdominals, as well as diaphragm) to create as much muscular tension and to help create as much pressure as possible within the trunk.
As you draw breath into your belly button (or think about drawing breath into your belly button) you should be looking to push your hands out by spreading your abs out. What you are trying to do is push out with your external obliques this will help to set tension through the length of your trunk and increase the aforementioned inter-abdominal pressure. This should be done before you begin the descent on the squat or before you begin to lift the bar during the deadlift.
As you begin to lift the bar or as you begin to stand up during the squat you should start to exhale hard but keep your mouth. You are exhaling against your closed glottis (this is a structure in the windpipe that stops air from passing through when it’s closed) this will help to increase the pressure, even more, when you are lifting the weight this increase in pressure should help to increase your core stability, your inter-abdominal pressure and give you more drive during the lift.
When you pass the sticking point or when you complete the concentric portion of the lift you can then exhale your breath and this will complete the process of bracing and the Valsalva manoeuvre (the process of breathing you just went through).
You should rehearse and practice this sequence of bracing and breathing for every rep if you are warming up with the bar or you are about to attempt a new max it shouldn’t matter the intent to brace and execute as well as you can should be the same everu time you get under the bar. Lifters who are sloppy with warm-ups or who don’t respect lightweights the same as they respect the heavier loads are normally the lifters who wind up with injured backs from adopting sloppy technique or who’s form breaks down under heavy loads.
Using your bracing and breathing to hold onto a good spine shape
As we have discussed briefly above the optimal position or the strongest position for the spine to be in is the natural S curve. This means you should have a small and natural lordotic curve of the lower back and a slight upward curve of the upper back or thoracic spine.
When you are setting up it is going to be the muscles of the hips and lower back that are going to help you lock in and support your lower back, whilst the muscles of the upper back and shoulder girdle are going to help to support and brace the upper back. It is important to learn how to engage these muscle groups and prepare them to undertake strain or to go under load. Probably the biggest issue when people are taught how to deadlift or when they are self taught is that they don’t appreciate the need for tension in their set up or the need for them to feel like they are under an immense amount of strain well before the bar comes off the floor. Most people are taught to deadlift by being told to take their stance a certain width, grip the bar in a certain manner and then for them to “keep their back flat” whilst they lift the bar off the floor. Telling someone to keep their back flat is a step in the right direction as it makes the lifter or the person you are teaching how to deadlift aware that the shape of their back is something they should be acutely be aware of.
In reality what the lifter should be hearing is that they need to adopt the natural S curve of their spine as we have spoken about above. They should have a natural indentation of their lower back with their upper back showing a slight rounding. For heavily muscled lifters or lifters who are following a well-developed programme, their upper back should be heavily muscled so it may appear that their upper back is flat or even slightly extended. If you are wondering if they are overextending their thoracic spine as their coach some palpitation (pressing your fingers against the bony landmarks of their spine) while they are set up in their starting position can let you feel the position that their spine is actually in. What follows is how to ensure you are adopting a well executed braced position ensuring the integrity of your spine during heavy deadlifting these cues apply to both the sumo and the conventional deadlift, however, will differ in execution and application.
Connecting to the bar / pulling the slack
The first thing you need to do before even thinking of setting your back position is to pull the slack or lack of tension out of yourself (through your arms and upper back/shoulder girdle) and the barbell (through the malleability/bend of the bar and the manufactured distance between the top of the sleeve of the barbell and top of the inside of the plate). You need to do this to make sure the tension we are going to set up in your back, core and lower body isn’t going to be lost. When you pull on the barbell without taking the slack you will get pulled forward and your position will be compromised by the weight of the barbell jerking on or coming as a surprise.
You should also pull your arms long making sure you don’t have any bend in your arm or any slack through your grip or shoulders. Your arms are only connections to the deadlift apart from holding onto the bar and allowing your lower body to act on the barbell they should be inert. One of the most common acute injuries (injuries that happen suddenly) are ruptured biceps during the deadlift this normally happens from the over/underhand grip also known as mixed grip. The underhand side of the grip places a lot more tension through the bicep on that side due to the underturned grip, when this is combined with a sharp or jerking motion to get the bar off the floor or from the lifter trying to utilise their arms to help lift the bar combined with a heavyweight the force on the bicep can cause the bicep tendon can fail and this is what causes ruptured biceps during deadlifting. This is one of the main reasons why it is so important to keep your arms straight and inert during the lift.
You should pull the tension from the barbell, your arms and also your upper back, as we will discuss later when setting up to pull the bar it is your back, core and glutes that will be used to set your back to protect your spine. You can pull the tension out of your upper back by extending the straightening out of your arms to pulling your scapula apart and getting a really good stretch on the lats this will leave your upper back rounded which is fine as we are only preparing to brace to begin the movement. It is of the utmost importance to hold this tension through your upper body and bar when you move onto bracing your body and preparing to perform the exercise.
You should also take this opportunity to pull the bar in tight against your shins, do not let the bar come forward during any portion of your setting up or lifting the bar as this increases the forces going through your spine exponentially.
When you have your hips in the air pulling the slack out of the bar this is the perfect time to get the air required to create as much intra-abdominal tension as possible. As you lift your hips up and pull the slack from both your arms and the bar inhale as much air as you can take in to your lunges from that position and push your abdomen out. Think about pushing your obliques out or pushing your core out into your belt. This will create an increase in pressure in your abdomen as discussed earlier and will help to support your lower back/spine and help you to keep your core stiff.
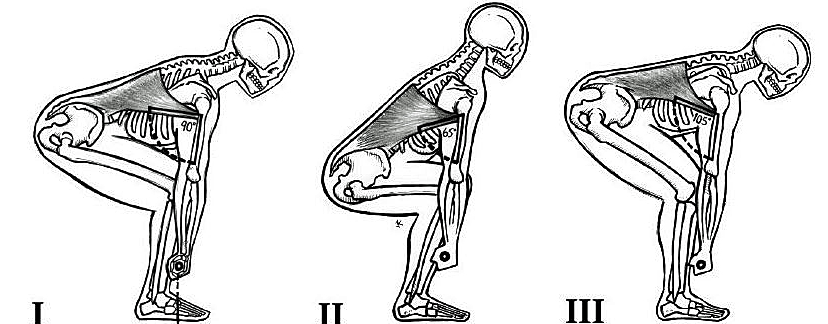
Figure is taken from www.powerliftingtowin.com
Setting your core and preparing to pull
The next stage is to get your hip height correct there isn’t really a foolproof way of putting this across in a general way since it is specific to the person, your build and your set up. For instance, your correct hip height will change when you do the following:
- Change your stance width significantly
- Change your deadlift style (moving from sumo to conventional)
- If you move from a deficit to lifting from a block.
The general rule of thumb is that when you lift the bar your hips, shoulders and the bar should rise together. If your hips shoot up first then chances are your hips are too low, if you round your back wildly before the bar comes off the floor then you don’t have the slack pulled out of the bar or you haven’t set up your core or braced correctly. When you have your hip height correct, the slack pulled out of the bar and your core braced, as soon as you apply pressure to the barbell through your legs and hips the bar should break off the floor and your shoulders and hips should rise together.
Your hips rising independently of this setup is an indication you have the hip height wrong. Video from the side with a weight around 70-80% perform singles and vary your hip height, review the video and see which one best represents this criterion.
Once you have pulled all of the slack out of the bar and have your hips set at the correct height for your body shape and stance width. You need to brace your lower back, upper back and core to make sure your spine is protected and that you can keep your core stiff during the lift to not only minimise the chance of injury but also increase your efficiency to and strength during the lift. If you keep your back position intact you will never miss a lift at lockout as your joint angles become less and less as the bar gets closer to your lockout position/hips this has the effect of making you stronger. Missing at lockout is almost exclusively a knock on effect of losing your back position during the deadlift the reason being once your back rounds and you approach lockout and your knees and hips are either close to being fully extended or are fully extended you will be left with a large weight in your hands and with only the muscles of the lower back (Erector spinae muscles shown in the figure above) to extend or unfurl your spine.
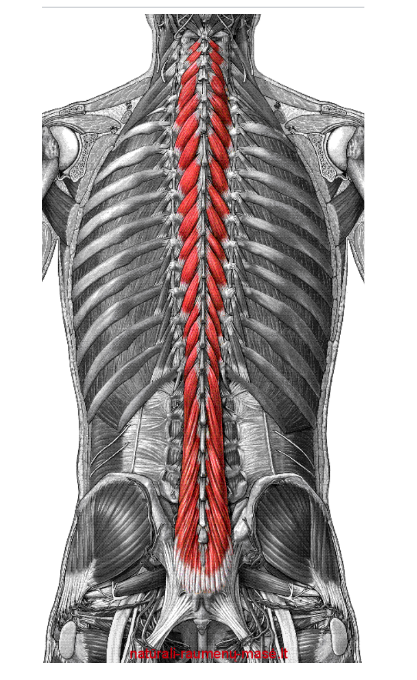
The muscles of the erector spinae work much better underload isometrically where they can help to transfer the force generated by larger muscle groups which have evolved for locomotion in the human body namely in the instance of the deadlift the glutes and hamstrings at the hip and the quadriceps at the knee. When a lifter is in a position where the knee and hips are more or less locked out then the much weaker muscles of the erector spinae are left to finish the extension of the back a task which they are simply not really equipped to do. Some lifters can grind out a deadlift better than others when it comes to the bar getting stuck at the top of the lockout but this doesn’t mean it’s a desirable trait we should be looking to develop.
If you allow your spine to round and you are missing lifts off the floor, at the knee or high up the thigh the net result is the same. You have compromised your spine and lack the ability to apply the necessary leverage onto your trunk using the muscles of the hip and knees to lock out the deadlift. This is simply incorrect technique, less efficient movement and ultimately putting yourself in harm’s way for no discernable advantage.
To be in a position where you can be sure your spine is protected and your core is stiff and allowing you the most optimal linkage to generate force from you need to
- Pull the slack out of your upper body and the bar
- Ensure you are using the Valsalva manoeuvre to make sure you are using intra-abdominal pressure to your advantage
- Engaging the glutes to help extend the lumbar spine and reinforce your natural arch.
- Engaging the muscles of the upper back (lats, traps and rhomboids) to hold tension through your upper back and make sure it can withstand the force of the barbell pulling it forward during the deadlift.
Once you or your lifter has taken the slack out of their upper back and the barbell, taken in a breath to help support their spine and got their hips starting in the correct position the next step is for them to engage their glutes to help support their lumbar arch. The best cue to help them achieve the support and extension required to hold the lower back in a good position is for them to physically push their knees out. By pushing the knees out the lifter will be engaging the glutes, glute med and muscles of the lower back such as the erector spinae.
To see the difference this simple cue makes to the tension that a lifter can produce in the muscles of their lower back simply get a training partner or your lifter to set up for deadlift as normal (this cue will work for both conventional stance and sumo stance deadlift) and get them to physically push their knees out. For a conventional lifter, you can cue them to push their knees out against their arms or to physically push their arms out with their thighs. In the sumo deadlift, you can ask the lifter to push their knees behind the bar or to rotate their thigh out from the hip. While they are performing this cue you should palpate the muscles either side of their spine this can be done by simply putting the flat of your palm onto the small of their lower back or you can lightly prod the muscles of their lower back before and after they have enacted the cue. What you should feel is a notable change in the tone of the muscles of the lower back. Once the lifter has enacted the cue of pushing their knees out you should be able to feel that the muscles of the lower back have increased noticeably in hardness or tone this is a sign that they are under an increased amount of tension which will help to support the position the spine is currently adopting.
Some other ways of putting across this cue is to ask the lifter to screw themselves into the floor or to try and grasp the floor using their whole foot for some lifters these cues might resonate a bit more. In my own experience, the definite task of getting a lifter to push their knees out physically against their knees works better for most peoplke as grasping the floor with your foot is a bit abstract.
The next and final part of bracing is to set up the muscles of the upper back to support the thoracic spine. If the upper back isn’t correctly braced then it will round, this rounding will have a knock on effect of pulling the rest of the spine into flexion. This flexion of the lumbar spine will either come through fatigue during the set stemming from the back getting tired as the lifter accumulates fatigue from each rep leading to the eventual failure of the muscles of the lower back to fight the flexion being forced upon it from the flexion of the upper back. It can also come from just the sheer load of the barbell overcoming the strength of the core and lumbar spine and pull it into flexion this will almost certainly mean a failed lift.
Setting a solid upper back is essential to increasing the loads with which you can train with day to day, the ability to hold a good position in deadlift from session to session is what will ultimately lead to you being able to handle heavier training loads as the muscles of the back will be utilised isometrically meaning that they will undergo much less stress from training meaning you can handle more frequency and volume in the lift.
The secret to setting a solid upper back is to to utilise the muscles of the upper back mainly the lats, rhomboids, lower traps and serratus anterior to pull the back into an extended position and provide the tension along the upper back necessarily to fight the flexion being applied by the force of the bar pulling down on the lifters arms. One of the best cues you can use to help and engage the lats and pull the upper back into as much tension as you can against the bar is to think about bending the bar around your body. From the bottom of the lift you should be thinking about externally rotating your arms (turning the pinky of each hand in towards your body while maintaining a good grip on the bar) this external rotation of the humerus (upper arm) will engage the lats and the muscles around the shoulder girdle to produce the tension required in the upper back to prepare to brace against the load when it leaves the floor.
Other good cues you can use to produce the same effect or to prepare for the lift are to stick your chest out from the bottom of the lift this can have the non desired effect of having the lifter adopting too much extension of the upper back and adopting a weaker position but for some lifters and especially for novice lifters it can be a very easy way to convey the movement or intention you are using. Later down the line you can maybe explain or understand the position you are looking to adopt in more specific or nuanced language when the lifter or you have developed a more in-depth knowledge and understanding of the movement.
Another way of putting across the desired tension is to focus on pulling your scapula (shoulder blades) together if you think about pinching a pencil between your shoulders this is a good visual cue you can use. Another good cue is if you are a coach or if you have a training partner for you or your training partner to put your pinky or index finger in between the lifter’s shoulder blades and have them physically try and grab your finger with the muscles of the upper back.
You want to use the muscles of the upper back to provide the tension and support needed to hold the natural upwards curve of the upper back during the deadlift. We are not looking to push the upper back into a more extended position that is needed for safe execution of the lift.
Breaking the bar off the floor
Finally once you have braced and set your position from the floor the final part of the lift is to break the bar off the floor. This is going to be the main sticking point for lifters who are used to lifting with a rounded spine they will normally feel initally like they have lost all of their speed. If you get the set up correct the whole of your body should be under a metric shit tonne of pressure to the point where you even think about extending your knees the bar should pop off the floor. There shouldn’t be any need to think about tearing the bar sloppily from the floor. If you apply the correct set up when you go to lift the bar it will come free off the floor with ease.
When the bar is moving then you can think about accelerating it as hard as you can. The initial part of the movement needs to be done with more of a “squeezing” or “prying” action as trying to go fast with any slack in your set up is going to result in you rounding your back. If you successfully create as much tension as you can using the steps above breaking the bar off the floor should literally be as easy as thinking of extending your knees and it should come free.
Once the bar is moving it is then a simple action of bringing your hips forward and the bar back a process excellently explained in this Juggernaught video
Hopefully this article has give you the tools you need to start deadlifting with an ideal back positon and help you to train with an injured back or to protect a healthy one.
Marc


")

")


